Convolution is a mathematical operation that is an essential part of digital signal processing and computer vision algorithms. This guide will look at what convolution is and how to use it in computer graphics and signal processing. The tutorial provides short examples and code snippets in various programming languages such as: JavaScript, WebGL, C++ and more.
What is convolution?
Convolution is a mathematical operation on two signals that forms a third signal. It expresses how the form of one is changed by the other using the integral of the product of two functions after one is moved over the other. The term also occurs as Faltung, which is its German name and means folding.
Тhe convolution operation finds applications in many fields, some of which are: computer graphics, machine vision, statistics, audio processing, and many others.
Our focus in this blog post is on computer graphics, so we’ll only talk about how to convolve discrete signals.
Image Convolution
In image processing the convolution is the base of many general purpose filtering algorithms. Convolution relates three signals of interest: input signal, output signal, and filtering kernel.
- The input signal – an array of pixels that we extract from a picture file.
- The filtering kernel – a small matrix of numbers that contains specific coefficients
- The output signal – s a new modified filtered image
In the convolution process, we multiply the color value of a pixel and its neighbors by a matrix (the filtering kernel). The operation is performed for each pixel of the input image.

One dimensional convolution
This type of convolution operates with one-dimensional signals.It is worth noting that an image is a two-dimensional matrix of pixels. However, some filter operators are separable. This means we can convert them to a one-dimensional array and convolve them in two passes: once by rows and once by columns. This is often a more computationally optimal way to filter. Example of such operators are: Average blur, Gaussian filter and Sobel edge detector.
C++ Source Code
The short C++ code snippet below illustrates how we can apply a simple averaging filter to a 1-D signal. For simplicity, we set the following constraints:
- The size of the kernel should not exceed the length of the input signal
- Kernel size is an odd number
- We will omit filtering at the boundaries
bool convolve_1d(std::vector<double>& data, const std::vector<double>& kernel)
{
  // The kernel should be with odd size and no bigger than the data signal
  if ((data.size() >= kernel.size()) && (kernel.size() & 1))
  {
    std::vector<double> result(data.size());
    const unsigned m = kernel.size() / 2;
    for (unsigned x = m; x < data.size() - m; x++)
    {
      double value = 0;
      for (unsigned k = 0; k < kernel.size(); k++)
        value += data[x + k - m] * kernel[k];

      result[x] = value;
    }
    std::swap(data, result);

    return true;
  }
  return false;
}
The following code snippet shows an example usage of convolve_1d:
std::vector<double> source = { 1, 2, 3, 4, 5, 6, 7, 8, 9, 10, 11, 12 };
// Do a simple average filter
convolve_1d(source, { 1, 1, 1 });
The program output is:
0.000, 6.000, 9.000, 12.000, 15.000, 18.000, 21.000, 24.000, 27.000, 30.000, 33.000, 0.000Two dimensional convolution
Many filters in computer graphics use two-dimensional convolution. The concept is the same as for 1-D convolution, but the math is done in 2D space for the X and Y axes.
Generally speaking, the computational resources for 2-D convolution are significant. Fortunately, there are various optimization options that we will mention here.
Note that many computer graphics textbooks suggest rotating the kernel matrix 180 degrees relative to the source and target images. However, for simplicity, the following sample code snippets do not do this!
C++ Source Code
Let’s take a look on how to implement image convolution with c++ code. For simplicity we will use monochrome picture with 8-bits per pixel. The convolve_2d function shows a sample solution of Gaussian smooth in C++.
bool convolve_2d(Image& data, const Kernel& kernel)
{
  // The kernel should be with odd size and no bigger than the data signal
  if ((data.GetWidth() >= kernel.GetWidth()) && (kernel.GetWidth() & 1) &&
    (data.GetHeight() >= kernel.GetHeight()) && (kernel.GetHeight() & 1))
  {
    Image result(data.GetWidth(), data.GetHeight(), data.GetStride());
    const unsigned mx = kernel.GetWidth() / 2;
    const unsigned my = kernel.GetHeight() / 2;
    for (unsigned y = my; y < data.GetHeight() - my; y++)
    {
      for (unsigned x = mx; x < data.GetWidth() - mx; x++)
      {
        double value = 0;
        for (unsigned ky = 0; ky < kernel.GetHeight(); ky++)
        {
          for (unsigned kx = 0; kx < kernel.GetWidth(); kx++)
            value += static_cast<double>(data(y + ky - my, x + kx - mx)) * kernel(ky, kx);
        }
        // Clamp in range [0 - 255]
        result(y, x) = static_cast<uint8_t>(std::min(std::max(value, 0.), 255.));
      }
    }
    std::swap(data.GetImageData(), result.GetImageData());

    return true;
  }
  return false;
}
For simplicity we use our C++ Image class template.The following code snippet shows an example usage of convolve_2d:
typedef TImage<uint8_t, std::vector<uint8_t>> Image;
typedef TImage<double> Kernel;
Image image;
Kernel kernel(3, 3, 1); // 3x3 filter mask
...
auto& kernelData = kernel.GetImageData();
kernelData = {
	1, 2, 1,
	2, 4, 2,
	1, 2, 1
};

// Normalize the blur kernel coefficients so they sum to 1
const double scale = std::accumulate(kernelData.begin(), kernelData.end(), 0);
std::for_each(kernel.GetImageData().begin(), kernel.GetImageData().end(),
    [scale](double &c) { c /= scale; }
);
// Smooth our image with Gaussian filter
convolve_2d(image, kernel);
GLSL Source Code
The C++ is a great way to do convolution. However, the algorithm is resource intensive in terms of CPU usage. So we often use GPU hardware acceleration for image processing by convolution. The following code fragment shows an example of how to convolve an image using GLSL (OpenGL Shading Language). The code is suitable for code suitable for WebGL and OpenGL algorithms.
#define KERNEL_SIZE 3 // Let's say 3x3
#define HALF_SIZE (KERNEL_SIZE / 2)
uniform float u_kernel[KERNEL_SIZE*KERNEL_SIZE];
uniform float u_bias;
void main() {
  vec2 textCoord = gl_FragCoord.xy / u_textureSize;
  vec2 onePixel = vec2(1.0, 1.0) / u_textureSize;
  vec4 result = vec4(u_bias);
  for (int y = 0; y < KERNEL_SIZE; y++){
    for (int x = 0; x < KERNEL_SIZE; x++){

      vec2 uv = textCoord + vec2(x - HALF_SIZE, y - HALF_SIZE) * onePixel;
      result += texture2D(u_image, uv)*u_kernel[y*KERNEL_SIZE + x];
    }
  }
  gl_FragColor = vec4(result.rgb, 1.0);
}
The code accepts the following shader variables:
- u_image – this is our source image
- u_kernel – the filtering kernel array for example [1, 2, 1, 2, 4, 2, 1, 2, 1]
- u_bias – this parameter shifts the range of the filter
Image Convolution by SVG Filters
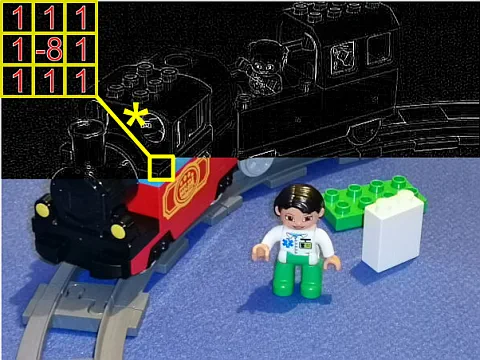
We can implement the famous Laplacian edge detector by convolution made using SVG filters.
<svg width="640" height="480" viewBox="0 0 640 480">
<defs>
<filter id="filterEdges">
<feConvolveMatrix
kernelMatrix="1 1 1 1 -8 1 1 1 1"
order="3 3"
bias="0"
divisor="1"
preserveAlpha="true" />
</filter>
</defs>
<image x="5" y="5" width="300" height="420" preserveAspectRatio="true"
xlink:href="https://upload.wikimedia.org/wikipedia/zh/3/34/Lenna.jpg"/>
<image x="310" y="5" width="300" height="420" preserveAspectRatio="true"
filter="url(#filterEdges)"
xlink:href="https://upload.wikimedia.org/wikipedia/zh/3/34/Lenna.jpg"/>
</svg>SVG has built-in support for convolution using the feConvolveMatrix element. Some of its attributes are:
- kernelMatrix – list of numbers that make up the convolution kernel
- order – the attribute gives the size of the matrix
- bias – the attribute shifts the range of the filter
- divisor – specifies the value by which the result will be divided
Convolution with Canvas API
There is a new Canvas API extension that gives ability to use SVG filters directly in JavaScript. The spec is not final yet, so be caution about using it in production. However, some web browsers like Google Chrome and Microsoft Edge support it well.
function drawFrame(source){
  const canvas = document.querySelector("canvas");
  const context = canvas.getContext("2d");
  canvas.width = source.naturalWidth || source.videoWidth;
  canvas.height = source.naturalHeight || source.videoHeight;
  ctx.filter = new CanvasFilter([
      {
        filter: "convolveMatrix",
        kernelMatrix: [[0, 1, 0], [1, -4, 1], [0, 1, 0]],
         bias: 0,
         divisor: 1,
         preserveAlpha: "true",
      }
   ]);
  context.drawImage(source, 0, 0);
}
Example Results

Useful Resources
Below you can find links to useful articles on the topic:
- SVG Filters for Image Processing – FIVEKO
- The Upcoming CanvasFilter API – FIVEO
- Convolution on Wikipedia
- Kernel in image processing – Wikipedia
- SVG ConvolveMatrix Specification – W3C
Conclusion
This guide provides a brief introduction to the practical use of image convolution. It shows different ways to implement 1D and 2D convolution filters in different programming languages. This mathematical technique is essential for many algorithms from various fields of life and technology. The best thing is that we can use it to create nice graphic effects and web applications.


